[WebGIS với ArcGIS Server – API 4.x #8] – Hiển thị chú giải (Legend) bằng Legend widget
Bài này chúng ta sẽ tìm hiểu cách hiển thị chú giải của các đối tượng trên bản đồ. ArcGIS Javascript API cung cấp cho chúng ta một Widget để hiển thị chú giải đó là Legend widget, tuy nhiên Legend widget chỉ hỗ trợ Feature layer và chúng ta phải phụ thuộc giao diện vào widget này mà rất khó để tùy biến chúng. Ở bài này mình sẽ giới thiệu 2 cách tiếp cận với việc hiển thị Legend, 1 là sử dụng Legend widget, 2 là sử dụng service legend của ArcGIS Server cung cấp.
Hiển thị chú giải (Legend) bằng Legend widget
Đầu tiên chúng ta thêm module legend trong khai báo require
require(["esri/widgets/Legend"], function(Legend) { /* code goes here */ });
Với cách này chúng ta phải sử dụng thêm cả FeatureLayer nên phải khai báo thêm FeatureLayer trong require
<span class="hljs-built_in">require</span>([<span class="hljs-string">"esri/layers/FeatureLayer"</span>], <span class="hljs-function"><span class="hljs-keyword">function</span>(<span class="hljs-params">FeatureLayer</span>) </span>{ <span class="hljs-comment">/* code goes here */</span> });
Tổng hợp thì chúng ta sử dụng các module như sau
require([
"esri/Map",
"esri/views/MapView",
"esri/layers/FeatureLayer",
"esri/widgets/Legend",
"dojo/dom",
"dojo/on",
"dojo/domReady!"
], function (Map, MapView, FeatureLayer, Legend, dom, on) {
//code
});
Với code bài trước, chúng ta thay vì sử dụng MapImageLayer thì sẽ chuyển sang dùng FeatureLayer, chú ý là mỗi sup layer chúng ta phải đưa vào 1 FeatureLayer. Ví dụ mình có 2 layer thì sẽ viết như sau:
var layer1= new FeatureLayer({
url: "http://localhost:6080/arcgis/rest/services/ThuaDat/ThuaDat/MapServer/1"
});
var layer0= new FeatureLayer({
url: "http://localhost:6080/arcgis/rest/services/ThuaDat/ThuaDat/MapServer/0"
});
Khai báo Map và layer:
var map = new Map({
layers: [layer0,layer1]
});
Khai báo View: chú ý: chúng ta phải có sẵn thẻ <div> với id=”ui-map-view”
var view = new MapView({
container: "ui-map-view",
map: map
});
Khai báo legend trong hàm then của view:
view.then(function () {
var legend = new Legend({
view: view,
layerInfos: [{
layer: layer1,
title: "Thửa đất"
}, {
layer: layer0,
title: "Đồ họa"
}
]
});

// // Thêm legend widget ở góc phải dưới của map
view.ui.add(legend, "bottom-right");

on(dom.byId("chkLayer0"), "change", function (ev) {
layer0.visible = ev.target.checked;
});
on(dom.byId("chkLayer1"), "change", function (ev) {
layer1.visible = ev.target.checked;
});
});
Trong view.then() chúng ta có thể thêm đoạn code bật tắt layer như ở bài trước, nhưng với trường hợp chúng ta đã tách các sublayer ra thành những layer riêng thì chỉ cần trỏ đến properties visible của layer là được.
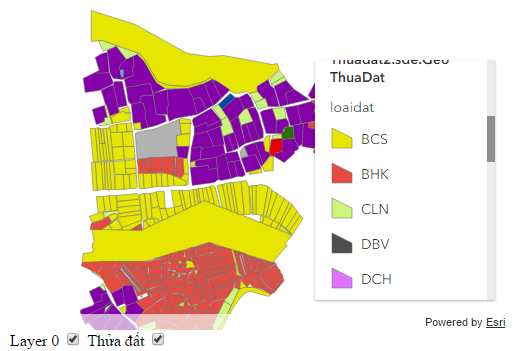
Chú giải sẽ hiển thị như sau:
Full code webgis có hiển thị chú giải (Legend) bằng Legend widget
Code toàn bộ bài, mình có chỉnh sửa style chút cho dễ nhìn.
<!DOCTYPE html>
<html>
<head>
<title></title>
<meta charset="utf-8" />
<link rel="stylesheet" href="https://js.arcgis.com/4.0/esri/css/main.css">
<script src="https://js.arcgis.com/4.0/"></script>
<style>
html, body {
margin: 0;
padding: 0;
width: 100%;
height: 100%;
}

#ui-map-view {
width: 500px;
height: 500px;
}
</style>
<script>
require([
"esri/Map",
"esri/views/MapView",
"esri/layers/FeatureLayer",
"esri/widgets/Legend",
"dojo/dom",
"dojo/on",
"dojo/domReady!"
], function (Map, MapView, FeatureLayer, Legend, dom, on) {

var layer1 = new FeatureLayer({
url: "http://localhost:6080/arcgis/rest/services/ThuaDat/ThuaDat/MapServer/1"
});
var layer0 = new FeatureLayer({
url: "http://localhost:6080/arcgis/rest/services/ThuaDat/ThuaDat/MapServer/0"
});
var map = new Map({
layers: [layer0,layer1]
});
var view = new MapView({
container: "ui-map-view",
map: map
});
view.then(function () {
on(dom.byId("chkLayer0"), "change", function (ev) {
layer0.visible = ev.target.checked;
});
on(dom.byId("chkLayer1"), "change", function (ev) {
layer1.visible = ev.target.checked;
});
// // get the first layer in the collection of operational layers in the WebMap
// // when the resources in the MapView have loaded.
var legend = new Legend({
view: view,
layerInfos: [{
layer: layer1,
title: "Thửa đất"
}, {
layer: layer0,
title: "Đồ họa"
}
]
});

// // Adds an instance of Legend widget to the
// // bottom right of the view.
view.ui.add(legend, "bottom-right");
});
});
</script>
</head>
<body>
<div id="ui-map-view"></div>
<label for="chkLayer0">Layer 0</label>
<input type="checkbox" id="chkLayer0" checked="checked" />
<label for="chkLayer1">Thửa đất</label>
<input type="checkbox" id="chkLayer1" checked="checked" />
</body>
</html>
Bài này chúng ta đã tìm hiểu cách sử dụng legend widget để hiển thị legend. Bài sau chúng ta sẽ tìm hiểu cách thứ 2 để hiển thị legend một cách linh hoạt hơn, dễ dàng tùy biến hơn.
Tác giả: Đỗ Xuân Cường
Nguồn bài viết: cuongdx313.wordpress.com
Coi thêm ở :
[WebGIS với ArcGIS Server – API 4.x #8] – Hiển thị chú giải (Legend) bằng Legend widget
Nhận xét
Đăng nhận xét